Ford Escape Manuals
Ford Escape 2020-2024 Service Manual / Electrical / Lighting / Exterior Lighting / Diagnosis and Testing - Daytime Running Lamps (DRL)

Ford Escape: Exterior Lighting / Diagnosis and Testing - Daytime Running Lamps (DRL)

Diagnostic Trouble Code (DTC) Chart

Diagnostics in this manual assume a certain skill level and knowledge of Ford-specific diagnostic practices.
REFER to: Diagnostic Methods (100-00 General Information, Description and Operation).


  Diagnostic Trouble Code Chart


Module   DTC Description Action
  BCM B124A:11 Right Daytime Running Light: Circuit Short To Ground   GO to Pinpoint Test A
  BCM B124A:15 Right Daytime Running Light: Circuit Short To Battery or Open   GO to Pinpoint Test A
  BCM B124B:11 Left Daytime Running Light: Circuit Short To Ground   GO to Pinpoint Test A
  BCM B124B:15 Left Daytime Running Light: Circuit Short To Battery or Open   GO to Pinpoint Test A

Global Customer Symptom Code (GCSC) Chart

Diagnostics in this manual assume a certain skill level and knowledge of Ford-specific diagnostic practices.
REFER to: Diagnostic Methods (100-00 General Information, Description and Operation).


Symptom Action
Lighting/Glass/Vision > Exterior Lighting > Daytime Running > Inoperative GO to Pinpoint Test A
Lighting/Glass/Vision > Exterior Lighting > Daytime Running > Stays On GO to Pinpoint Test A

Symptom Charts

Symptom Chart: DRL

Diagnostics in this manual assume a certain skill level and knowledge of Ford-specific diagnostic practices.
REFER to: Diagnostic Methods (100-00 General Information, Description and Operation).


  Symptom Chart

NOTE: Before beginning diagnostics, refer to Description and Operation in this section for proper DRL operation.


Condition Actions
A module does not respond to the diagnostic scan tool  
REFER to: Communications Network (418-00 Module Communications Network, Diagnosis and Testing).
The DRL are inoperative or always on   GO to Pinpoint Test A
One or both LED DRL /front park lamps do not dim with the parking lamps ON or do not brighten when the parking lamps are OFF - Mid and high series headlamps  
REFER to: Parking, Rear and License Plate Lamps (417-01 Exterior Lighting, Diagnosis and Testing).

Pinpoint Tests


PINPOINT TEST A: THE DRL (DAYTIME RUNNING LAMPS) ARE INOPERATIVE OR ALWAYS ON

Refer to Wiring Diagrams Cell 85 for schematic and connector information.

Normal Operation and Fault Conditions

REFER to: Exterior Lighting - Overview (417-01 Exterior Lighting, Description and Operation).
REFER to: Exterior Lighting - System Operation and Component Description (417-01 Exterior Lighting, Description and Operation).

DTC Fault Trigger Conditions

DTC Description Fault Trigger Condition
BCM B124A:11 Right Daytime Running Light: Circuit Short To Ground A continuous memory and on-demand DTC that sets when the BCM detects a short to ground from the RH DRL voltage supply circuit.
BCM B124A:15 Right Daytime Running Light: Circuit Short To Battery Or Open A continuous memory and on-demand DTC that sets when the BCM detects an open or short to voltage from the RH DRL voltage supply circuit.
BCM B124B:11 Left Daytime Running Light: Circuit Short To Ground A continuous memory and on-demand DTC that sets when the BCM detects a short to ground from the LH DRL voltage supply circuit.
BCM B124B:15 Left Daytime Running Light: Circuit Short To Battery Or Open A continuous memory and on-demand DTC that sets when the BCM detects an open or short to voltage from the LH DRL voltage supply circuit.

Possible Sources

  • Wiring, terminals or connectors
  • Headlamp assembly
  • LED control module
  • BCM

NOTE: Before beginning this test, refer to Description and Operation in this section for proper DRL operation.

A1 CHECK THE OPERATION OF THE PARKING LAMPS
  • Ignition ON.
  • For low series headlamps, place the headlamp switch in the HEADLAMPS position and observe the low beam headlamps.
  • For mid and high series headlamps, place the headlamp switch in the PARKING LAMPS position and observe the LED DRL /front park lamps.

Do the lamps operate correctly?
Yes For low series headlamps, if one of the DRL are inoperative, GO to A9
For mid and high series headlamps, if the one of the DRL are inoperative, GO to A4
For low series headlamps, if both of the DRL are inoperative or always on, GO to A3
For mid and high series headlamps, if both of the DRL are inoperative, GO to A3
For mid and high series headlamps, If the one or both of the DRL are always on, GO to A2
No For low series headlamps,
REFER to: Headlamps (417-01 Exterior Lighting, Diagnosis and Testing). For mid and high series headlamps,
REFER to: Parking, Rear and License Plate Lamps (417-01 Exterior Lighting, Diagnosis and Testing).

A2 CHECK THE BCM (BODY CONTROL MODULE) DRL (DAYTIME RUNNING LAMPS) CIRCUIT FOR A SHORT TO VOLTAGE
  • Ignition OFF.
  • Disconnect BCM C2280F .
  • Ignition ON.

Do the DRL continue to illuminate?
Yes REPAIR the DRL circuit in question.
No GO to A6

A3 CHECK THAT THE DRL (DAYTIME RUNNING LAMPS) ARE ENABLED
  • For conventional DRL , check if the DRL are enabled through a diagnostic scan tool.
  • For configurable DRL , check if the DRL are enabled through the IPC .

Are the DRL enabled?
Yes For low series headlamps, GO to A9
For mid and high series headlamps, GO to A4
No For conventional DRL , Using a diagnostic scan tool, ENABLE the DRL .
For configurable DRL , enable the DRL . REFER to the Owner's Literature for information on enabling the DRL .

A4 CHECK THE DRL (DAYTIME RUNNING LAMPS) CIRCUIT FOR VOLTAGE
  • Place the headlamp switch in the OFF position.
  • Ignition OFF.
  • Disconnect For mid series halogen headlamps, LH Headlamp C1021 or RH Headlamp C1041 .
  • Disconnect For high series LED headlamps, LH Headlamp C1284 or RH Headlamp C1285 .
  • Ignition ON.
  • Make sure there is enough ambient lighting that the autolamps system will not automatically illuminate the headlamps.
  • Place the headlamp switch in the AUTOLAMPS position.
  • For mid series halogen headlamps, measure:
    Click to display connectors

      LH Headlamp


    Positive Lead Measurement / Action Negative Lead
      C1021-5   Ground

    Click to display connectors

      RH Headlamp


    Positive Lead Measurement / Action Negative Lead
      C1041-5   Ground
  • For high series LED headlamps, measure:
    Click to display connectors

      LH Headlamp


    Positive Lead Measurement / Action Negative Lead
      C1284-5   Ground

    Click to display connectors

      RH Headlamp


    Positive Lead Measurement / Action Negative Lead
      C1285-5   Ground

Is the voltage greater than 11 volts?
Yes GO to A6
No GO to A5

A5 REPEAT THE ON-DEMAND SELF-TEST AND CHECK THE DRL (DAYTIME RUNNING LAMPS) CIRCUIT FOR VOLTAGE
  • Place the headlamp switch in the OFF position.
  • Using a diagnostic scan tool, perform the BCM self-test.
  • Clear the Diagnostic Trouble Codes (DTCs) and repeat the self-test (required to enable the lamp output driver).
  • Ignition OFF.
  • Ignition ON.
  • Place the headlamp switch in the AUTOLAMPS position.
  • For mid series halogen headlamps, measure:
    Click to display connectors

      LH Headlamp


    Positive Lead Measurement / Action Negative Lead
      C1021-5   Ground

    Click to display connectors

      RH Headlamp


    Positive Lead Measurement / Action Negative Lead
      C1041-5   Ground
  • For high series LED headlamps, measure:
    Click to display connectors

      LH Headlamp


    Positive Lead Measurement / Action Negative Lead
      C1284-5   Ground

    Click to display connectors

      RH Headlamp


    Positive Lead Measurement / Action Negative Lead
      C1285-5   Ground

Is the voltage greater than 11 volts?
Yes For mid series halogen headlamps, INSTALL a new headlamp assembly.
REFER to: Headlamp Assembly (417-01 Exterior Lighting, Removal and Installation). For high series LED headlamps, GO to A6
No GO to A7

A6 CHECK THE LED (LIGHT EMITTING DIODE) CONTROL MODULE
  • Place the headlamp switch in the OFF position.
  • Ignition OFF.
  • Connect Inoperative LH Headlamp C1284 or RH Headlamp C1285 if previously disconnected.
  • Connect BCM C2280F if previously disconnected.
  • Ignition ON.
  • CLEAR the Diagnostic Trouble Codes (DTCs), REPEAT the self-test (required to enable the lamp output driver) and cycle the ignition OFF and ON. REPEAT the self-test.
  • Activate the hazard flasher lamp function.
  • Operate the system and determine if the concern is still present.

Is the concern still present or does any Diagnostic Trouble Codes (DTCs) return?
Yes REMOVE the known good LED control module. INSTALL a new headlamp assembly.
REFER to: Headlamp Assembly (417-01 Exterior Lighting, Removal and Installation).
No REMOVE the known good LED control module. INSTALL a new LED control module.

A7 CHECK THE DRL (DAYTIME RUNNING LAMPS) CIRCUIT FOR A SHORT TO GROUND
  • Place the headlamp switch in the OFF position.
  • Ignition OFF.
  • Disconnect BCM C2280E .
  • For mid series halogen headlamps, measure:
    Click to display connectors

      LH Headlamp


    Positive Lead Measurement / Action Negative Lead
      C1021-5   Ground

    Click to display connectors

      RH Headlamp


    Positive Lead Measurement / Action Negative Lead
      C1041-5   Ground
  • For high series LED headlamps, measure:
    Click to display connectors

      LH Headlamp


    Positive Lead Measurement / Action Negative Lead
      C1284-5   Ground

    Click to display connectors

      RH Headlamp


    Positive Lead Measurement / Action Negative Lead
      C1285-5   Ground

Is the resistance greater than 10,000 ohms?
Yes GO to A8
No REPAIR the circuit. After the repair:
If no Diagnostic Trouble Codes (DTCs) are present, TEST the system for normal operation.
If DTC U1000:00 is present, CLEAR the Diagnostic Trouble Codes (DTCs) and REPEAT the self-test (required to enable the lamp output driver if DTC U1000:00 is present).
If DTC U3000:49 is present, INSTALL a new BCM .
REFER to: Body Control Module (BCM) (419-10 Multifunction Electronic Modules, Removal and Installation).

A8 CHECK THE DRL (DAYTIME RUNNING LAMPS) CIRCUIT FOR AN OPEN
  • For mid series halogen headlamps, measure:
    Click to display connectors

      LH Headlamp


    Positive Lead Measurement / Action Negative Lead
      C1021-5   C2280E-8

    Click to display connectors

      RH Headlamp


    Positive Lead Measurement / Action Negative Lead
      C1041-5   C2280E-9
  • For high series LED headlamps, measure:
    Click to display connectors

      LH Headlamp


    Positive Lead Measurement / Action Negative Lead
      C1284-5   C2280E-8

    Click to display connectors

      RH Headlamp


    Positive Lead Measurement / Action Negative Lead
      C1285-5   C2280E-9

Is the resistance less than 3 ohms?
Yes GO to A9
No REPAIR the circuit.

A9 CHECK FOR CORRECT BCM (BODY CONTROL MODULE) OPERATION
  • Disconnect and inspect all BCM and all related in-line connectors.
  • Repair:
    • corrosion (install new connector or terminals – clean module pins)
    • damaged or bent pins – install new terminals/pins
    • pushed-out pins – install new pins as necessary
  • Reconnect the BCM and all related in-line connectors. Make sure they seat and latch correctly.
  • Operate the system and determine if the concern is still present.

Is the concern still present?
Yes CHECK OASIS for any applicable service articles: TSB , GSB , SSM or FSA . If a service article exists for this concern, DISCONTINUE this test and FOLLOW the service article instructions. If no service articles address this concern, INSTALL a new BCM .
REFER to: Body Control Module (BCM) (419-10 Multifunction Electronic Modules, Removal and Installation).
No The system is operating correctly at this time. The concern may have been caused by module connections. ADDRESS the root cause of any connector or pin issues.


    Diagnosis and Testing - Autolamps

    Diagnostic Trouble Code (DTC) Chart Diagnostics in this manual assume a certain skill level and knowledge of Ford-specific diagnostic practices. REFER to: Diagnostic Methods (100-00 General Information, Description and Operation)...

    Diagnosis and Testing - Fog Lamps

    Diagnostic Trouble Code (DTC) Chart Diagnostics in this manual assume a certain skill level and knowledge of Ford-specific diagnostic practices. REFER to: Diagnostic Methods (100-00 General Information, Description and Operation)...

    Other information:

    Ford Escape 2020-2024 Service Manual: Removal and Installation - Driver Side Instrument Panel Speaker


    Special Tool(s) / General Equipment Interior Trim Remover Removal Position the speaker and grille up as an assembly. Use the General Equipment: Interior Trim Remover Disconnect and remove the speaker and grille as an assembly...

    Ford Escape 2020-2024 Service Manual: Removal and Installation - Front Stabilizer Bar Link


    Removal NOTICE: Suspension fasteners are critical parts that affect the performance of vital components and systems. Failure of these fasteners may result in major service expense. Use the same or equivalent parts if replacement is necessary. Do not use a replacement part of lesser quality or substitute design...

    Categories

    Master Access Code

    What Is the Master Access Code

    The master access code is a factory-set five-digit entry code. You can operate the keypad with the master access code at any time. The master access code is on the owner’s wallet card in the glove box and is available from an authorized dealer.

    Displaying the Master Access Code

    To display the factory-set code in the information display:
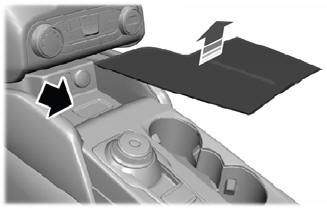
    Ford Escape. Master Access Code

    Remove the rubber mat. Insert the first programmed key in the backup slot. Press the push button ignition switch once and wait a few seconds. Press the push button ignition switch again and remove the key. Within 10 seconds, place a second programmed intelligent access key in the backup slot and press the push button ignition switch.

    read more

    Copyright © 2024 www.fordescape4.com