Ford Escape 2020-2026 Service Manual / Body and Paint / Body and Paint / Handles, Locks, Latches and Entry Systems / Removal and Installation - Hood Latch Release Cable
Ford Escape: Handles, Locks, Latches and Entry Systems / Removal and Installation - Hood Latch Release Cable
Removal
Front Cable
-
Remove the hood latch.
Refer to: Hood Latch (501-14 Handles, Locks, Latches and Entry Systems, Removal and Installation).
-
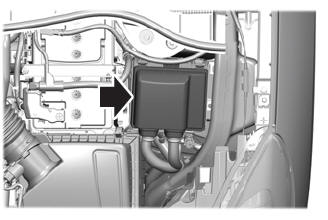
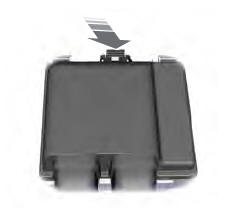
Open the hood latch release cable junction block cover and disconnect the front hood latch release cable.
-
Release the clips on the hood latch release cable junction block cover.
-
Open the hood latch release cable junction block cover.
-
Detach the rear cable from the mounting bracket.
-
Disconnect the rear hood latch release cable end.
-
Release the clips on the hood latch release cable junction block cover.
.jpg) |
-
Route the front hood latch release cable through the engine compartment.
-
Release the front hood latch release cable routing clips.
-
Route the front hood latch release cable through the engine compartment.
-
Release the front hood latch release cable routing clips.
.jpg) |
-
Remove the front hood latch release cable.
-
Release the front hood latch release cable routing bracket.
-
Release the front hood latch release cable routing clips.
-
Remove the front hood latch release cable.
-
Release the front hood latch release cable routing bracket.
.jpg) |
Rear Cable
-
Open the hood latch release cable junction block cover and disconnect the front hood latch release cable.
-
Release the clips on the hood latch release cable junction block cover.
-
Open the hood latch release cable junction block cover.
-
Detach the rear cable from the mounting bracket.
-
Disconnect the rear hood latch release cable end.
-
Release the clips on the hood latch release cable junction block cover.
|
-
Remove the cowl panel grille.
Refer to: Cowl Panel Grille (501-02 Front End Body Panels, Removal and Installation).
-
On LH side.
Remove the front scuff plate trim panel.
Refer to: Front Scuff Plate Trim Panel (501-05 Interior Trim and Ornamentation, Removal and Installation).
-
Remove the hood latch release and disconnect the rear hood latch release cable.
-
Remove the bolts.
-
Release the rear hood latch release cable from the mounting bracket.
-
Disconnect the rear hood latch release cable eyelet and remove the hood latch release.
-
Remove the bolts.
.jpg) |
-
Route the rear hood latch release cable through the cowl.
-
Release the rear hood latch release cable routing clip.
-
Route the rear hood latch release cable through the cowl.
-
Release the rear hood latch release cable routing clip.
.jpg) |
-
Remove the rear hood latch release cable.
-
Release the rear hood latch release cable routing clips.
-
Route the rear hood latch release cable grommet
through the cowl and remove the rear hood latch release cable.
-
Release the rear hood latch release cable routing clips.
.jpg) |
Installation
Rear Cable
-
Route the rear hood latch release cable through the cowl.
-
Route the rear hood latch release cable through the cowl.
-
Attach the rear hood latch release cable routing clip.
-
Route the rear hood latch release cable through the cowl.
.jpg) |
-
NOTE: This step is only necessary if reusing the original hood latch release cable.
Install the hood latch release and connect the rear hood latch release cable.
-
Connect the rear hood latch release cable eyelet.
-
Attach the rear hood latch release cable to the mounting bracket.
-
Install the bolts.
Torque: 12 lb.in (1.3 Nm)
-
Connect the rear hood latch release cable eyelet.
.jpg) |
-
Route the rear hood latch release cable through the engine compartment.
-
Route the rear hood latch release cable grommet through the cowl.
-
Attach the rear hood latch release cable routing clips.
-
Route the rear hood latch release cable grommet through the cowl.
.jpg) |
-
On LH side.
Install the front scuff plate trim panel.
Refer to: Front Scuff Plate Trim Panel (501-05 Interior Trim and Ornamentation, Removal and Installation).
-
Connect the front hood latch release cable and close the hood latch release cable junction block cover.
-
Attach the rear hood latch release cable end.
-
Attach the rear cable to the mounting bracket.
-
Close the hood latch release cable junction block cover.
-
Secure the clips on the hood latch release cable junction block cover.
-
Attach the rear hood latch release cable end.
 |
-
Install the cowl panel grille.
Refer to: Cowl Panel Grille (501-02 Front End Body Panels, Removal and Installation).
Front Cable
-
Install the front hood latch release cable.
-
Install the front hood latch release cable.
-
Attach the front hood latch release cable routing clips.
-
Attach the front hood latch release cable routing bracket.
-
Install the front hood latch release cable.
.jpg) |
-
Route the front hood latch release cable through the engine compartment.
-
Route the front hood latch release cable through the engine compartment.
-
Attach the front hood latch release cable routing clips.
-
Route the front hood latch release cable through the engine compartment.
.jpg) |
-
Connect the front hood latch release cable and close the hood latch release cable junction block cover.
-
Attach the rear hood latch release cable end.
-
Attach the rear cable to the mounting bracket.
-
Close the hood latch release cable junction block cover.
-
Secure the clips on the hood latch release cable junction block cover.
-
Attach the rear hood latch release cable end.
|
-
Install the hood latch.
Refer to: Hood Latch (501-14 Handles, Locks, Latches and Entry Systems, Removal and Installation).
 Removal and Installation - Hood Latch
Removal
NOTE:
Removal steps in this procedure may contain installation details.
Remove the air cleaner inlet pipe.
Refer to: Air Cleaner Intake Pipe (303-12C Intake Air Distribution and Filtering, Removal and Installation)...
 Removal and Installation - Hood Latch Release Handle
Removal
Remove the hood latch release handle.
Rotate the hood latch release handle.
NOTE:
Do not remove the retaining clip from the hood latch release handle...
Other information:
Ford Escape 2020-2026 Owners Manual: Voice Settings Commands
You can say the following commands to access the voice settings: You can use the volume control to adjust the volume of the system voice prompts. While prompt is active, adjust the volume control up or down to your desired setting. Note: Depending on the current climate control settings, the fan speed may automatically go down while issuing voice commands or while making and receiving pho..
Ford Escape 2020-2026 Service Manual: General Procedures - Wheel to Tire Runout Minimization
Check NOTICE: Non-Hunter brand balancers will not include the Ford-approved procedure for match-mounting in their software. NOTICE: Other balancing procedures that exist on non-Hunter brand equipment are not Ford approved and should not be used. NOTE: Road Force® values in illustrations are shown in pounds. NOTE: Match mounting is a technique used to reduce radial runout or ..
Categories
- Manuals Home
- 4th Generation Ford Escape Owners Manual
- 4th Generation Ford Escape Service Manual
- Opening and Closing the Hood
- Switching the Lane Keeping System On and Off. Switching the Lane Keeping System Mode. Alert Mode
- Description and Operation - Identification Codes
- New on site
- Most important about car
Under Hood Fuse Box
Locating the Under Hood Fuse Box
Accessing the Under Hood Fuse Box
Copyright © 2026 www.fordescape4.com